Formatting and loading FortiGate firmware image using TFTP
Description
This article is, about downloading and installing firmware from a TFTP server using the BIOS. We do this with the help of the command line interface.
We also need to install firmware from the TFTP server when the message 'OPEN BOOT DEVICE FAILED' shows up on the console. The local TFTP server is used for this purpose. The local TFTP server is necessary to fix the 'OPEN BOOT DEVICE FAILED' issue.
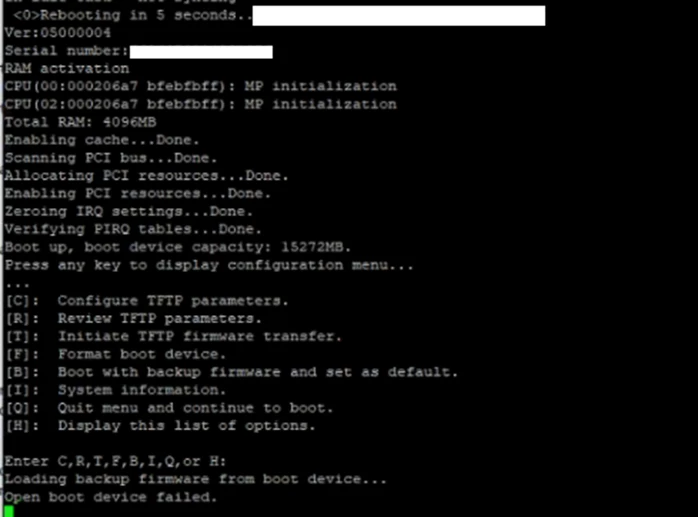
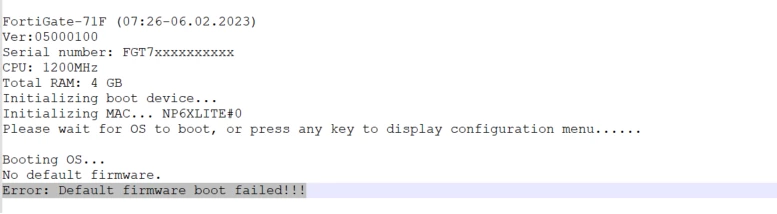
Some devices would report this as 'Default firmware boot failed!' in the console when the system boots up.
Caution:
When you install firmware from a TFTP server using the console the FortiGate unit will go back to its original settings.You should save your settings before you start the upgrade process.To do this you can use the graphical user interface or type, in some commands.Here are the commands you need to type:
* execute config
* execute backup ipsuserdefsig
The first command will save your current configuration.The second command will save any custom IPS signatures you have made for the FortiGate unit.
Scope
FortiGate.
Solution
Components:We need a things to get started with the FortiGate.A null modem or RJ-45 to DB9 console cable comes with the FortiGate.We also need an Ethernet RJ45 cable.The FortiGate also requires a client, such, as a PC running HyperTerminal on Windows.The FortiGate needs a TFTP server.:
Physical connection:
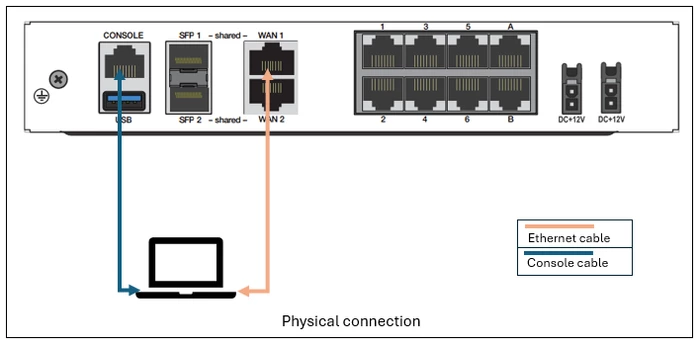
The connection can be made on any Ethernet port. In this case, the WAN1 or MGMT interface. Download the

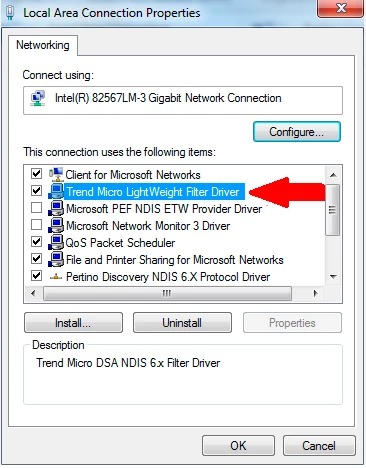
Disable the Windows firewall or any other third-party packet filtering application (for example, Trend Micro LightWeight Filter Driver).
Why Windows Firewall (Private and Public Profiles) needs to be temporarily disabled during firmware upgrades:During a FortiGate firmware upgrade using TFTP, the device operates as follows:
⦁ It first initiates communication with the PC hosting the TFTP server.
⦁ It then dynamically uses random high UDP ports to transfer the firmware image.
When Windows filtering is enabled:
⦁ UDP port 69 (used by TFTP) or dynamically assigned UDP ports may be blocked.
⦁ Windows may permit the initial connection but block the subsequent firmware data transfer.
⦁ As a result, the FortiGate remains waiting for the TFTP server, causing the upgrade process to appear stalled and preventing it from proceeding.
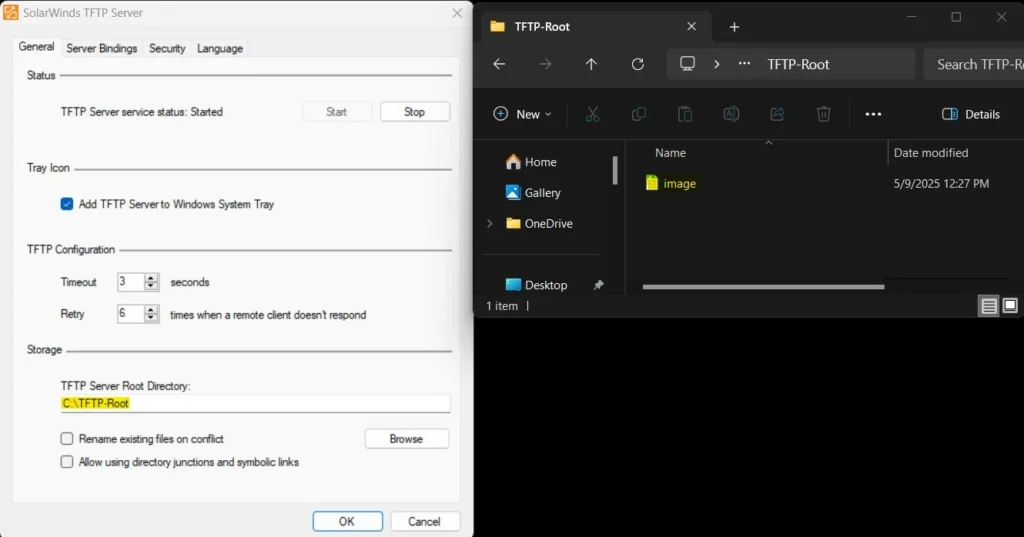
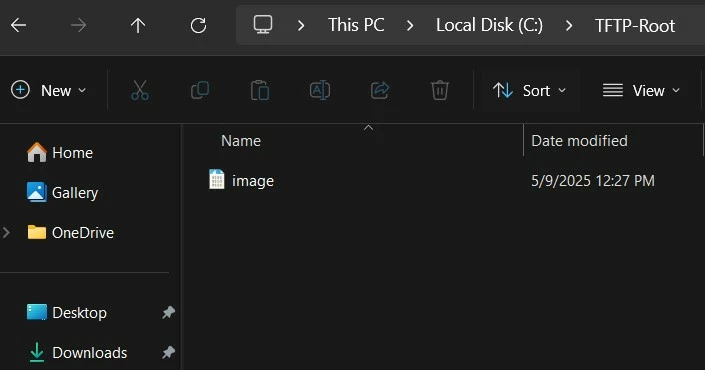
Create a directory and name it something like 'TFTP'. Move the firewall image to that directory. Rename the firmware image file to 'image' while keeping the original file extension as '.out'. The reason for renaming the image to 'image.out' is to have a much shorter file name compared with the default file name when the file is downloaded from 'support.fortinet.com'. If the file name is not changed, it can cause the TFTP file transfer to fail with the following error:
tftp error 1 (file not found.) try to recover...
Set the system's Ethernet interface IP as follows (the IP can be from any subnet):
IP address: 10.10.10.1.Subnet mask: 255.255.255.0.
Default Gateway: IP address that is set on FortiGate. In this example, 10.10.10.115.
Note 1:
Ensure that only the firmware file named 'image' is in the TFTP servers directory.If there are files, in that directory the FortiGate might not load the firmware correctly even if the file name is 'image.out'.The file name must be 'image' to workOther files can cause problems so remove them to be safe.
Note 1:
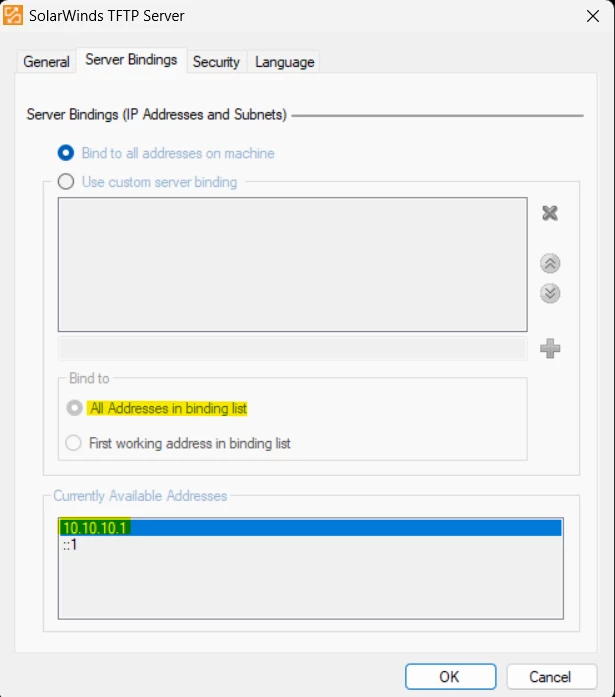
After formatting the FortiGate, it is normal for the SolarWinds TFTP Server not to display the IP address 10.10.10.1 in the binding list, as shown in the above image. This can be disregarded to
Note 3:
The connected network adapter will not show as 'connected,' and the NIC port on the PC will not light up until the file transfer begins.

Connect the computer to the FortiGate unit using the null modem cable. For detailed steps for this connectionTerminal client communication parameters: 8 bits no parity 1 stop bit 9600 baud (the FortiGate-300 uses 115,000 baud) Flow Control = None
Restart the FortiGate. When the console displays 'Press any key to display configuration menu...', press any other key.
FortiGate-81E (12:47-03.03.2017) Ver:05000007 Serial number: FGT81E*********1 CPU: 1000MHz Total RAM: 2 GB Initializing boot device... Initializing MAC... nplite#0 Please wait for OS to boot, or press any key to display the configuration menu.
When a list of choices with individual letters of the alphabet appears, press 'F' to format the device.
[C]: Configure TFTP parameters.
[R]: Review TFTP parameters.
[T]: Initiate TFTP firmware transfer.
[F]: Format boot device.
[I]: System information.
[B]: Boot with backup firmware and set as default.
[Q]: Quit menu and continue to boot.
[H]: Display this list of options.
Enter C,R,T,F,I,B,Q,or H:
It will erase data in boot device.
Continue? [yes/no]:
yesFormatting..........doneDone.
After that, the device will boot again. Again, a list of choices with letters will appear.
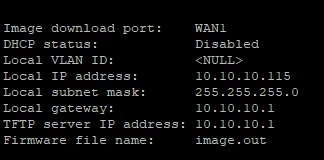
Press 'R' to review TFTP parameters.Enter C,R,T,F,I,B,Q,or H:RImage download port: WAN1 <----- This port of the FortiGate should be connected to the computer's Ethernet port.
DHCP status: Disabled Local VLAN ID: <NULL> Local IP address: 10.10.10.115 <----- FortiGate IP address. Local subnet mask: 255.255.255.0 Local gateway: 10.10.10.1 <----- Host IP address. TFTP server IP address: 10.10.10.1 <----- Host IP address running the TFTP
server.
Firmware file name: image.out <--- Rename instead of FGT_100F-v7.0.0-build0066-FORTINET.
Note:
If the 'Firmware file name' is more than a certain number of characters, it will say image not found. Reduce the number of characters in the file name on the TFTP server.Once again, a list of choices with letters will appear. Press 'C' to configure TFTP parameters.
[C]: Configure TFTP parameters.
[R]: Review TFTP parameters.
[T]: Initiate TFTP firmware transfer.
[F]: Format boot device.
[I]: System information.
[B]: Boot with backup firmware and set as default.
[Q]: Quit menu and continue to boot.
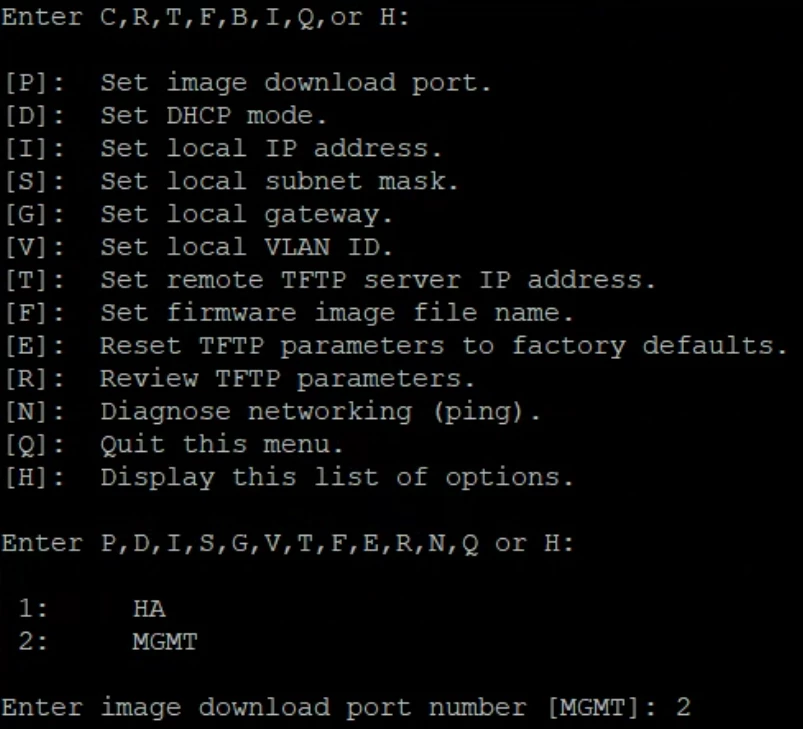
[H]: Display this list of options.Enter C,R,T,F,I,B,Q,or H:C
Change the parameters to be in line with the TFTP server configuration.
[P]: Set firmware download port.
[D]: Set DHCP mode.
[I]: Set local IP address.
[S]: Set local subnet mask.
[G]: Set local gateway.
[V]: Set local VLAN ID.
[T]: Set remote TFTP server IP address.
[F]: Set firmware file name.
[E]: Reset TFTP parameters to factory defaults.
[R]: Review TFTP parameters.
[N]: Diagnose networking(ping).
[Q]: Quit this menu.
[H]: Display this list of options.
Enter P,D,I,S,G,V,T,F,E,R,N,Q,or H: <----- [I]: Set local IP address.Enter local IP address [10.1.1.115]: 10.10.10.115.done
Enter P,D,I,S,G,V,T,F,E,R,N,Q,or H: <----- [S]: Set local subnet mask.Enter local subnet mask [255.255.255.0]: 255.255.255.0.done
Enter P,D,I,S,G,V,T,F,E,R,N,Q,or H: <----- [G]: Set local gateway.Enter remote TFTP server IP address [10.1.1.1]: 10.10.10.1.done
Enter P,D,I,S,G,V,T,F,E,R,N,Q,or H: <----- [T]: Set TFTP server IP address.Enter remote TFTP server IP address [10.1.1.1]: 10.10.10.1.done
Enter P,D,I,S,G,V,T,F,E,R,N,Q,or H: <----- [F]: Set firmware file name.Enter firmware file name [FGT_100F-v7.0.0-build0066-FORTINET.out]: image.out.done
Enter P,D,I,S,G,V,T,F,E,R,N,Q,or H: <----- [Q]: Quit this menu.
Note:
The link light on the FortiGate port used for firmware download and connect machine port will not blink or show up until the TFTP firmware transfer is initiated, as shown in the next step.The firmware image download Port can be changed from the Option 'P'.
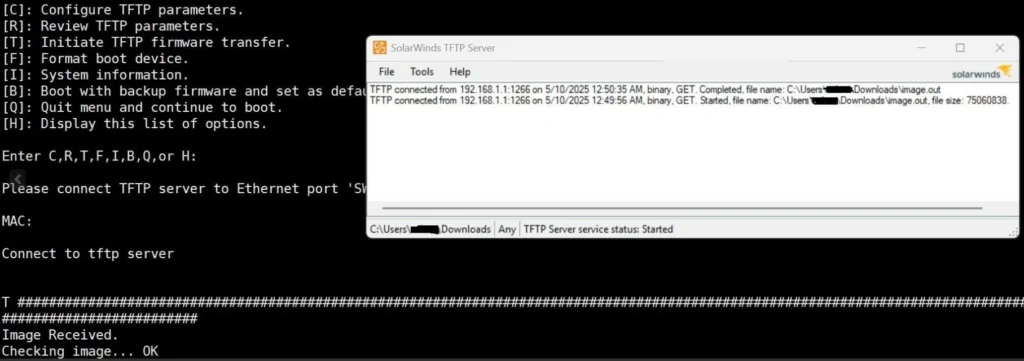
Press 'T' to initiate the TFTP firmware transfer.Please connect TFTP server to Ethernet port 'WAN1'.MAC: 94:ff:3c:6e:e9:66Connect to tftp server 10.10.10.1 ...
Note:
At times, the file transfer might not yield any errors or indicate that a connection to the TFTP server is being initiated, and it may appear to be stalled, as illustrated below:Please connect TFTP server to Ethernet port 'WAN1'.MAC: 94:ff:3c:6e:e9:66Gathering a Wireshark capture on the interface linked to the TFTP server would reveal that the destination port is unreachable, as demonstrated in the capture below:

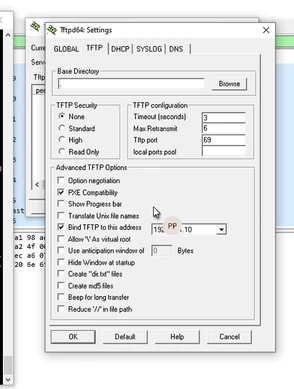
Review the TFTP server settings and make sure that the security level is set to none and the advanced TFTP options are set as follows:
After making these changes, the transfer of the file will start successfully.After this is connected and the transfer has begun, the screen will start filling with the '#' symbol, as shown below. This means that the TFTP transfer has started successfully.
After formatting the device, it will be reachable again using the default IP 192.168.1.99/24. So, the laptop connected to the management interface must have an IP address of this subnet, and then it will be possible to restore the configuration file via GUI and CLI.
Note:
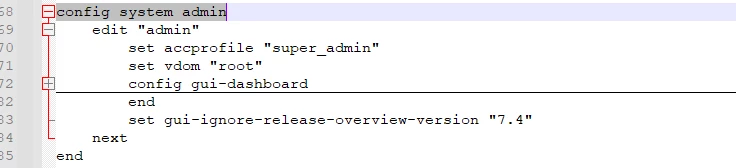
If formatting needs to be completed due to a lost admin password and an existing backup configuration has to be re-imported, make sure that the password configuration line has been removed from it, as shown in the screenshots below:Edit the backup config text file with a text editor such as Notepad++, delete the 'set password' line from the configuration, and save the file as a new file with a .conf extension.

If any error occurs while loading the firmware, the error will be similar to the following, in which case the solution may be found in the related articles below:Fatal error: Loading FOS fails! Please power cycle. System halted.Or:Fatal error: AV engine file authentication failed! Please power cycle. System halted.
Notes:
While transferring the image through the TFTP server you need to disable the Windows firewall or antivirus.Also if you are connected to WI-FI disconnect it while transferring the firmware image.If the 'connect to TFTP server' keeps showing a lot of 'T T T T T T T' instead of ########'there is a problem with downloading the firmware to the FortiGate.One issue could be that you named the image file wrong.Make sure you did not repeat.out twice, in the image name. One.out might be hidden,while the other.out is visible.

⦁ Consider when the PC is running Hyper-V. Windows automatically enables a virtual switch filter driver on the NICs. This will interfere with network traffic like TFTP (UDP/69) or broadcast traffic. That might be the reason why the FortiGate device cannot pull the file even though the TFTP server is running.